Guide: Configuring Microsoft Entra ID (Azure AD/Office 365) as an OIDC Provider
This document provides a comprehensive, step-by-step guide for administrators to configure your organization's Microsoft Entra ID (the identity platform for Office 365) as an OpenID Connect (OIDC) identity provider. The goal is to enable users from your Entra ID tenant to securely authenticate with our platform using their existing Microsoft credentials.
This guide is structured to reflect the interactive setup process between Entra ID and our platform, ensuring a smooth and successful integration.
Table of Contents
- Introduction & Workflow Overview
- Glossary of Entra ID Terms
- Part 1: Configure Microsoft Entra ID
- Part 2: Find Group Object IDs
- Part 3: Configure Our Platform
- Part 4: Add Redirect URI in Microsoft
- Conclusion & Next Steps
- Troubleshooting Common Issues
1. Introduction & Workflow Overview
Goal
Leverage your existing Microsoft Entra ID tenant as a trusted identity provider for our platform so users can sign in with their Office 365 credentials (SSO). We will configure Entra ID to send a user's group memberships, allowing our platform to automatically grant access to VDI sessions and other resources based on these groups.
Workflow Overview
Configuring an OIDC provider involves a two-way trust relationship: 1. Start in Microsoft Entra ID to generate the initial credentials (Client ID, Secret, and Issuer URL). 2. Enter these credentials in our platform to get a unique Redirect URI. 3. Return to Entra ID and add this Redirect URI to complete the secure handshake.
Prerequisites
- An active Microsoft 365 / Azure subscription.
- Administrative access to the Entra ID tenant (e.g., Global Administrator or Application Administrator).
- Users and relevant Security Groups already created (e.g., a
VDI_Usersgroup).
2. Glossary of Entra ID Terms
- Microsoft Entra ID: Cloud identity and access management for Microsoft services.
- Microsoft Entra admin center: Management portal at
https://entra.microsoft.com. - App Registration: Creates an application identity within Entra ID.
- Application (Client) ID: Unique app identifier (GUID).
- Client Secret: App password used when requesting tokens.
- Redirect URI: URL that Entra ID can send users back to after authentication.
- Token Configuration / Claims: Rules for what information (name, email, groups) is included in tokens.
- Object ID: Permanent unique ID for any Entra object (users/groups). We use Group Object IDs in group claims.
3. Part 1: Configure Microsoft Entra ID
- Sign in to the Microsoft Entra admin center (
https://entra.microsoft.com). - Navigate: Identity → Applications → App registrations. (or search for "App registrations" in the top bar)
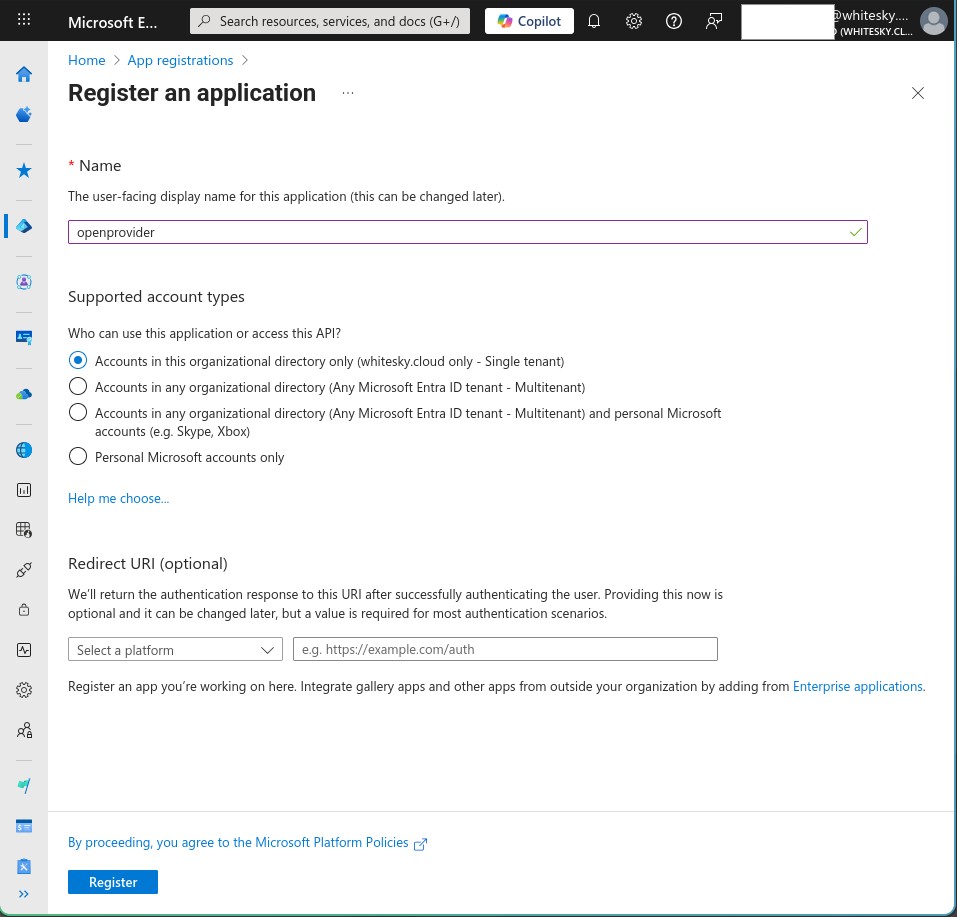
- Click “+ New registration”.
- Registration form:
- Name: e.g.,
Cloud VDI Platform Integration. - Supported account types: “Accounts in this organizational directory only (Single tenant)”.
- Redirect URI: Leave blank for now (we will add it later in Part 4).
- Click “Register”.
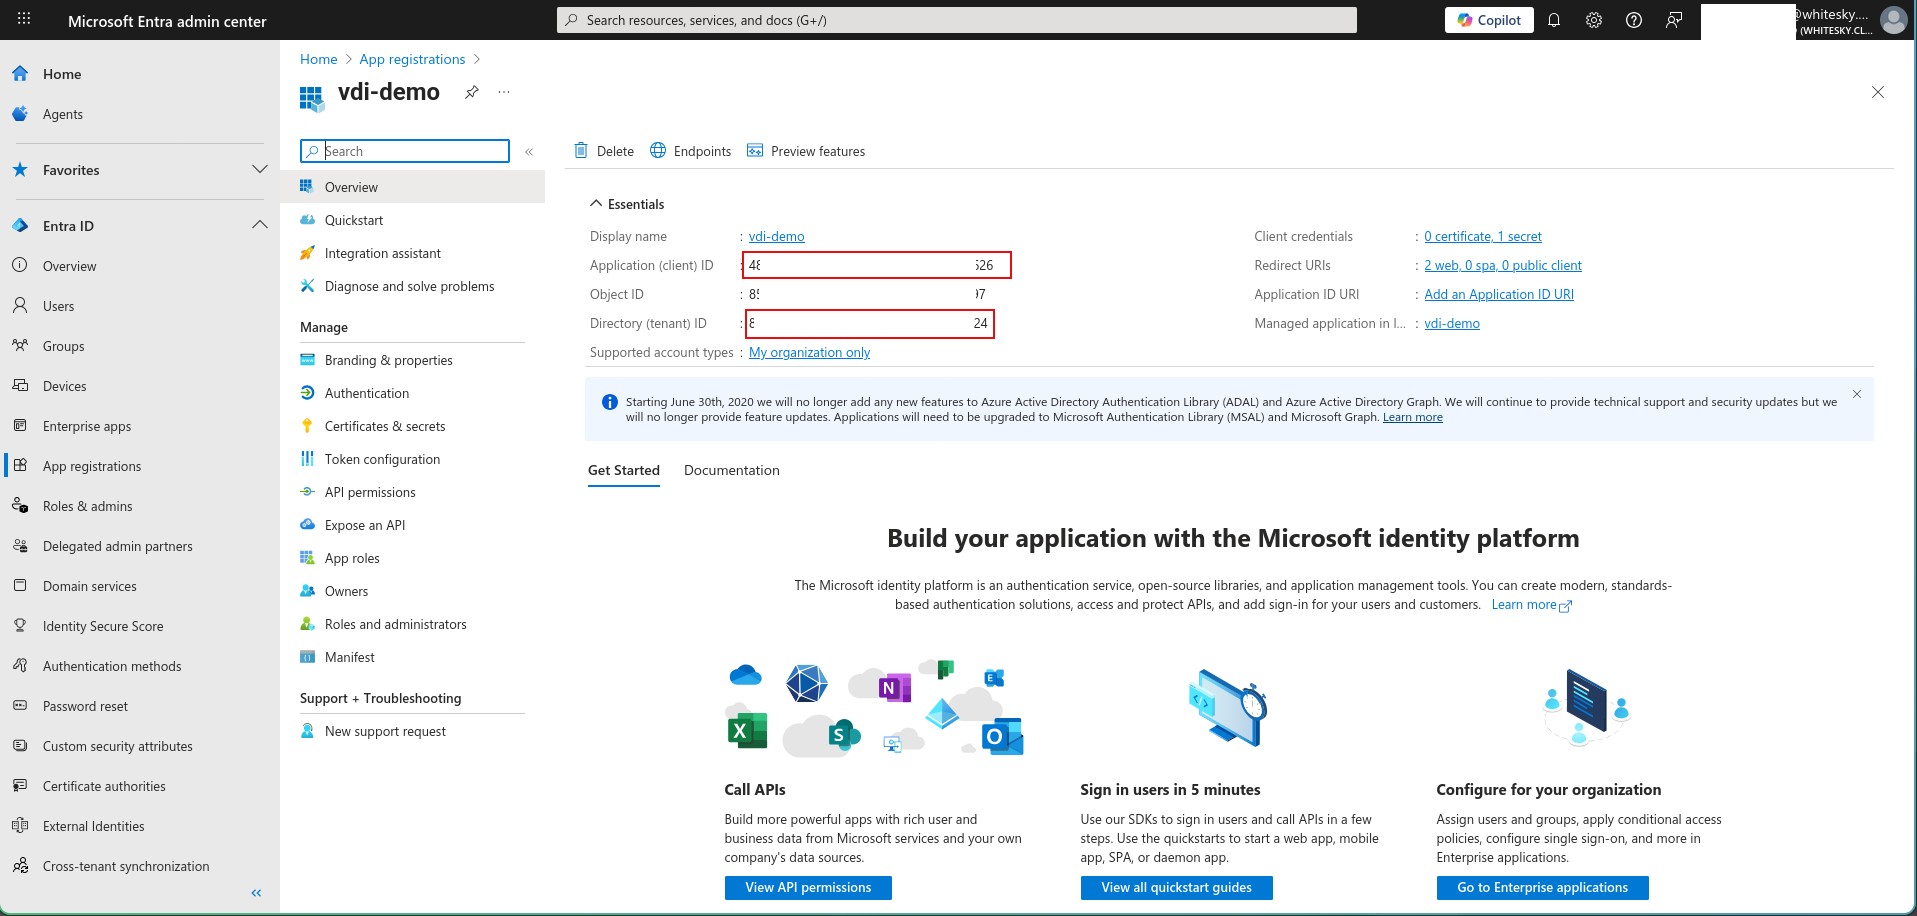
- On the Overview page, copy and securely store:
- Application (client) ID
- Directory (tenant) ID
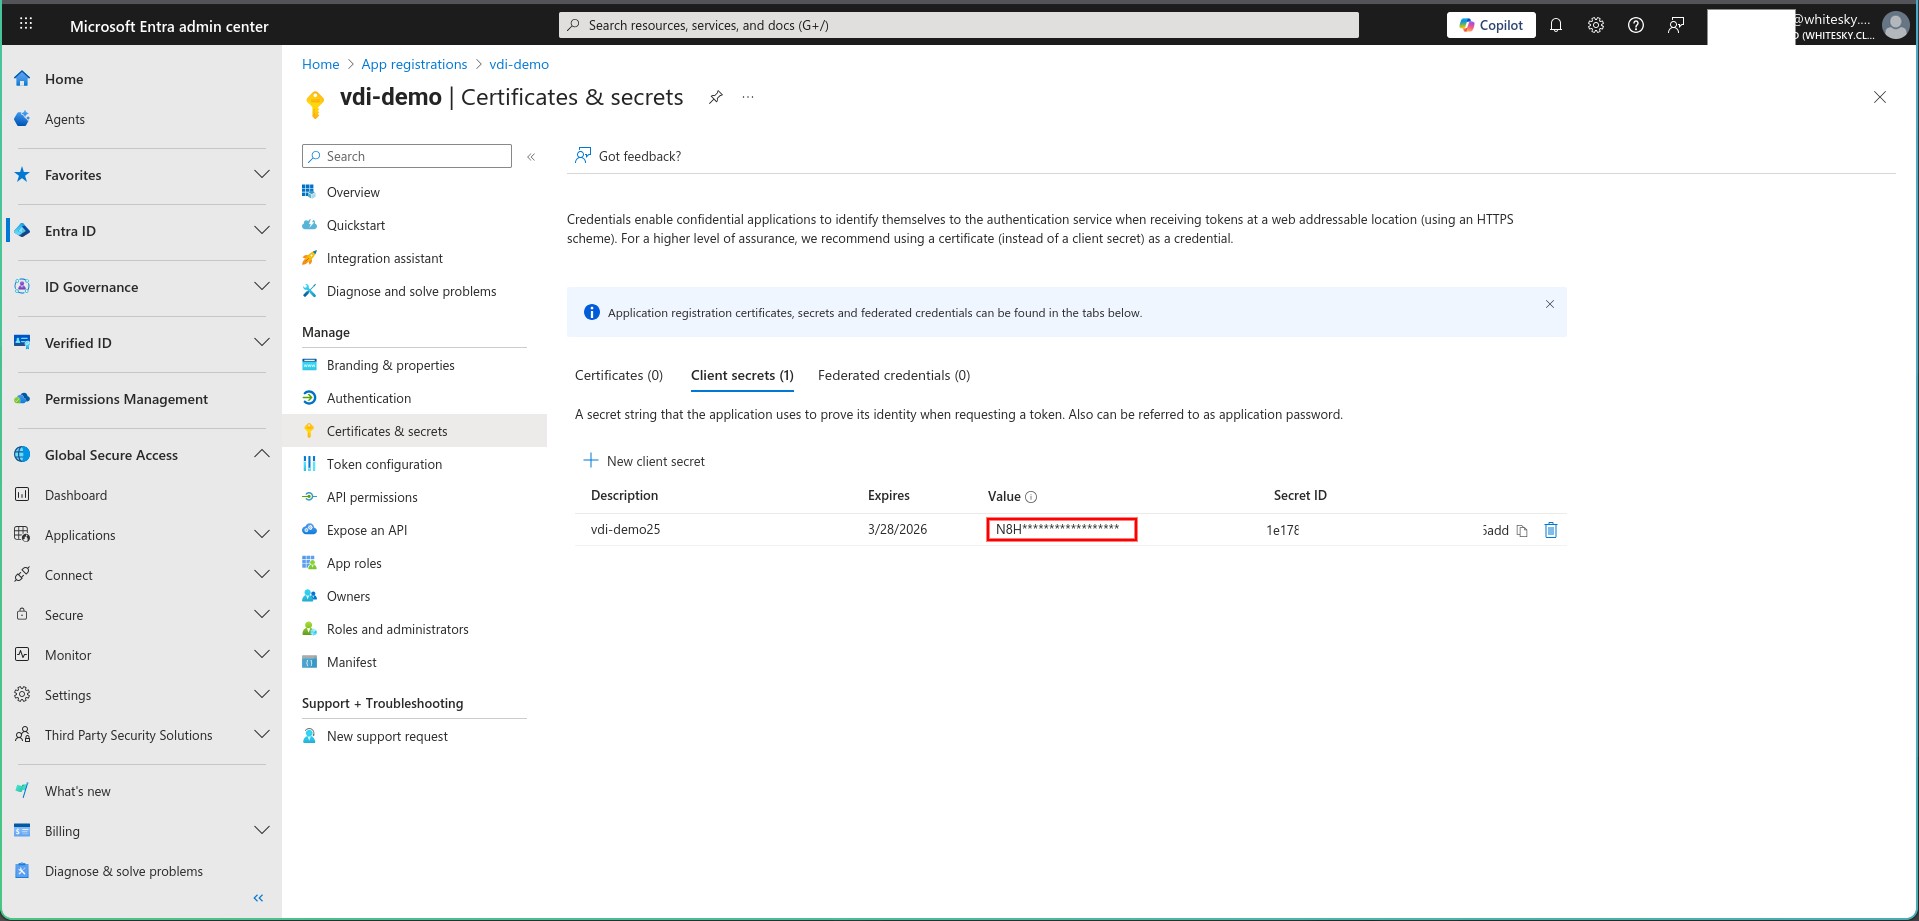
- Go to “Certificates & secrets”.
- Click “+ New client secret”, add a description (e.g.,
VDIPlatformSecret_2025) and expiry. - Click “Add”. Immediately copy the Secret “Value” and store it securely.
Enable Group Claims in the ID Token
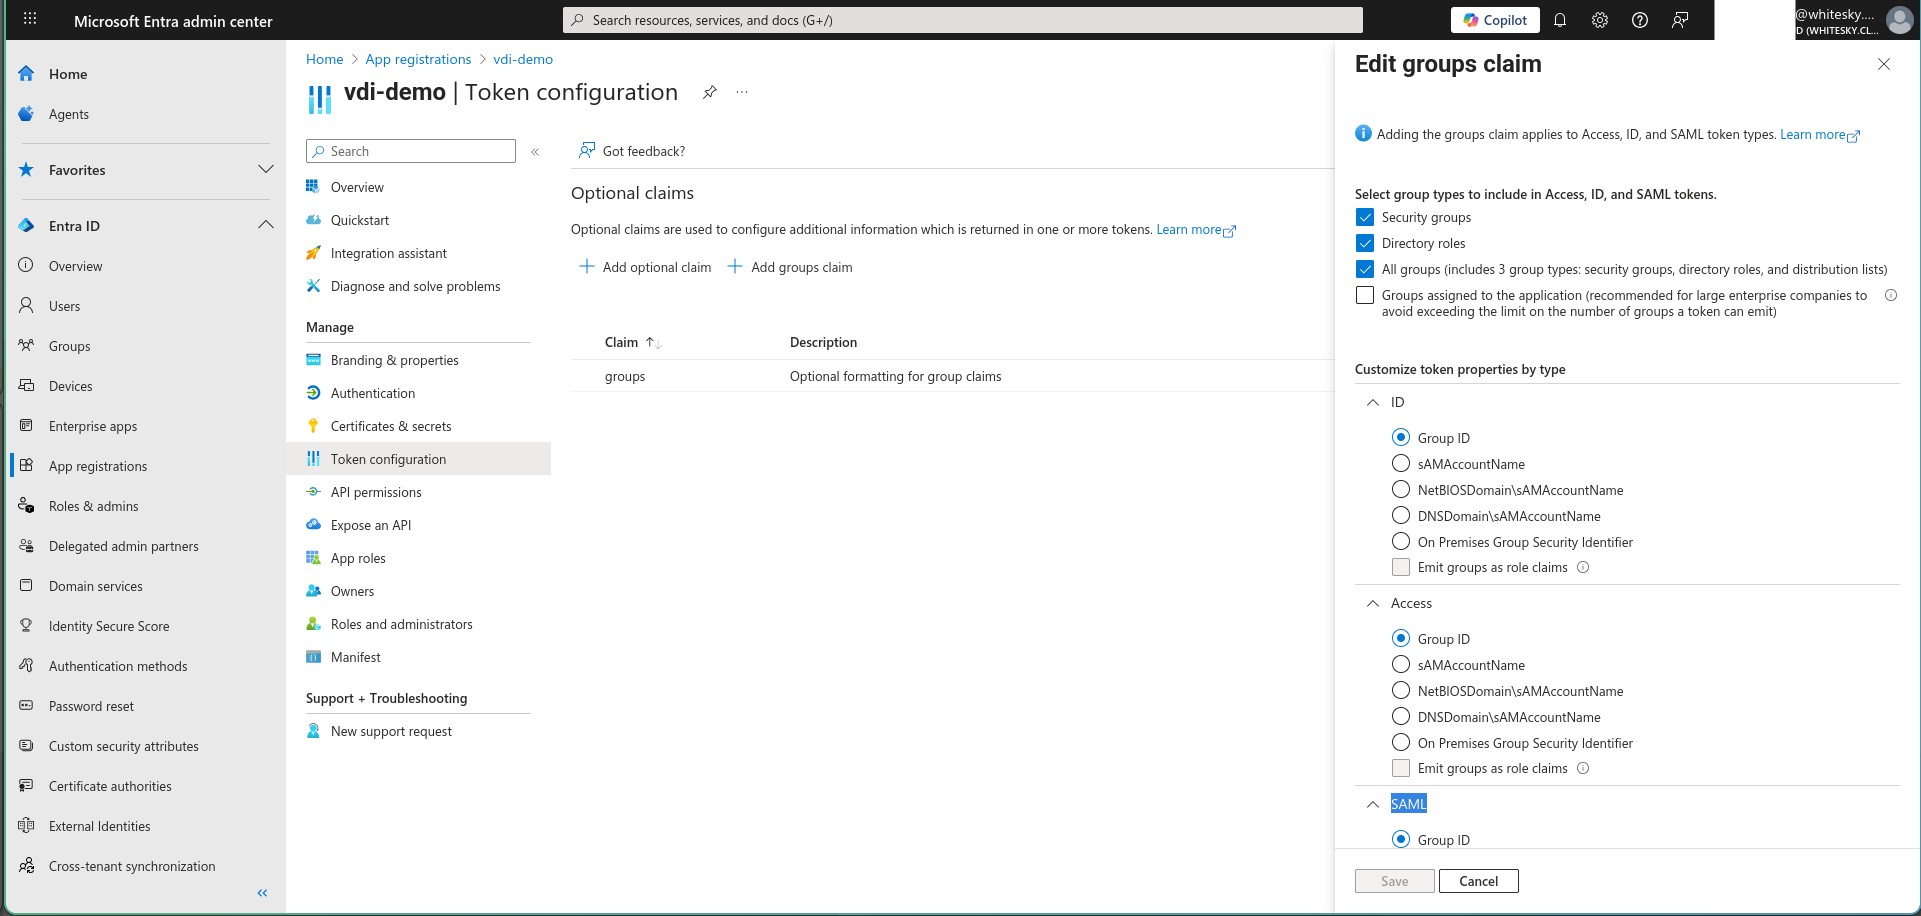
To allow our platform to receive users’ group memberships, enable group claims on the application:
- In the App Registration, open “Token configuration”.
- Click “+ Add groups claim”.
- Select “All groups”.
- Under “Customize token properties by type”, select “ID”.
- Ensure format is “Group ID”.
- Click “Add”.
4. Part 2: Find Group Object IDs
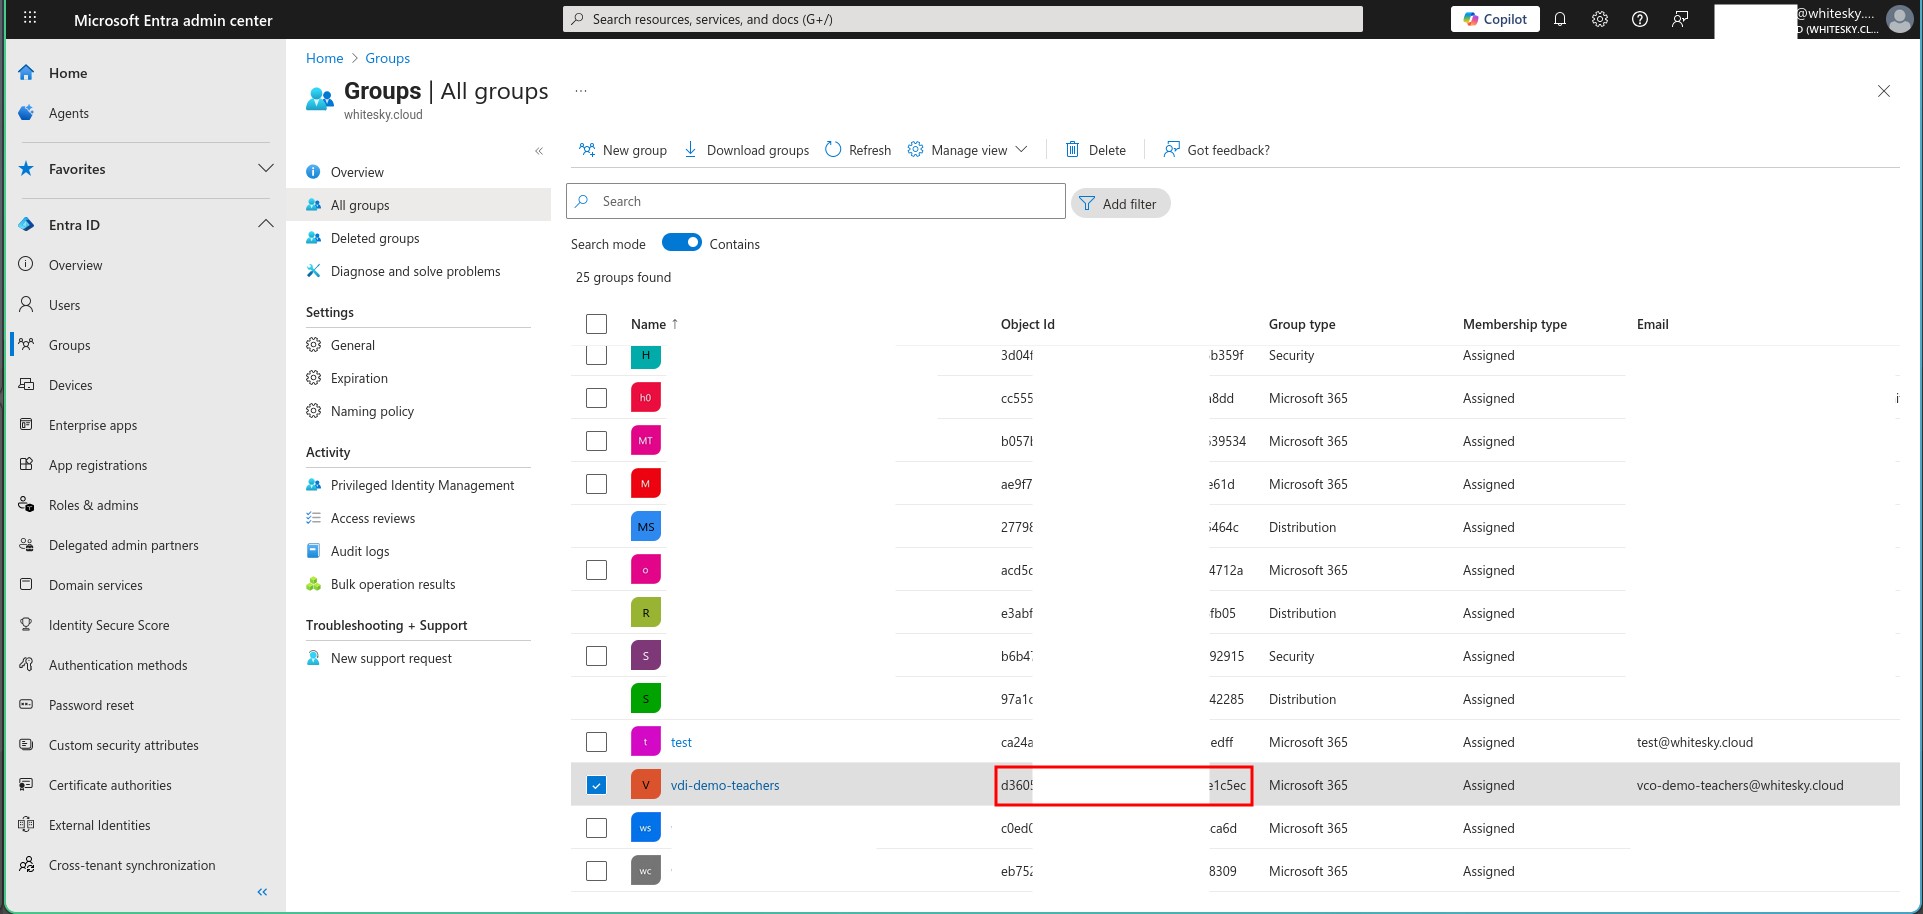
- In Entra admin: Identity → Groups → All groups.
- Copy each group’s “Object ID” (this is the permanent identifier used in mapping).
5. Part 3: Configure Our Platform
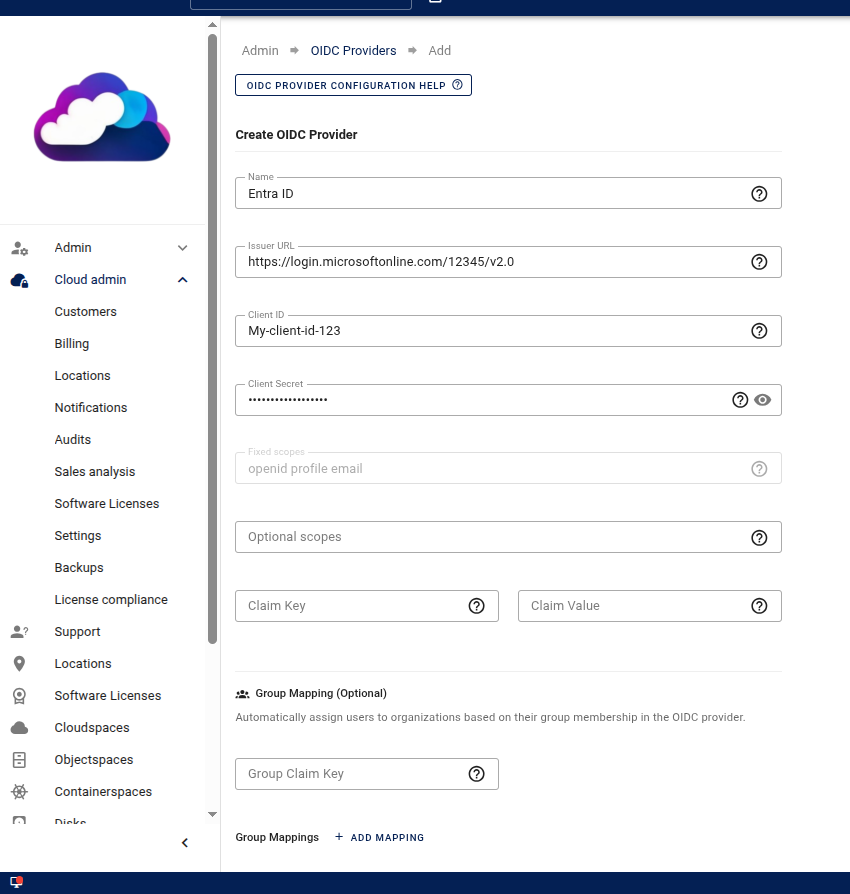
- In our platform’s console, go to Cloud admin → Settings → OIDC providers.
- Click “Add Provider”.
- Fill in:
- Name: e.g.,
Entra ID. - Client ID: Application (client) ID.
- Client Secret: Secret Value copied in Part 1.
- Issuer URL:
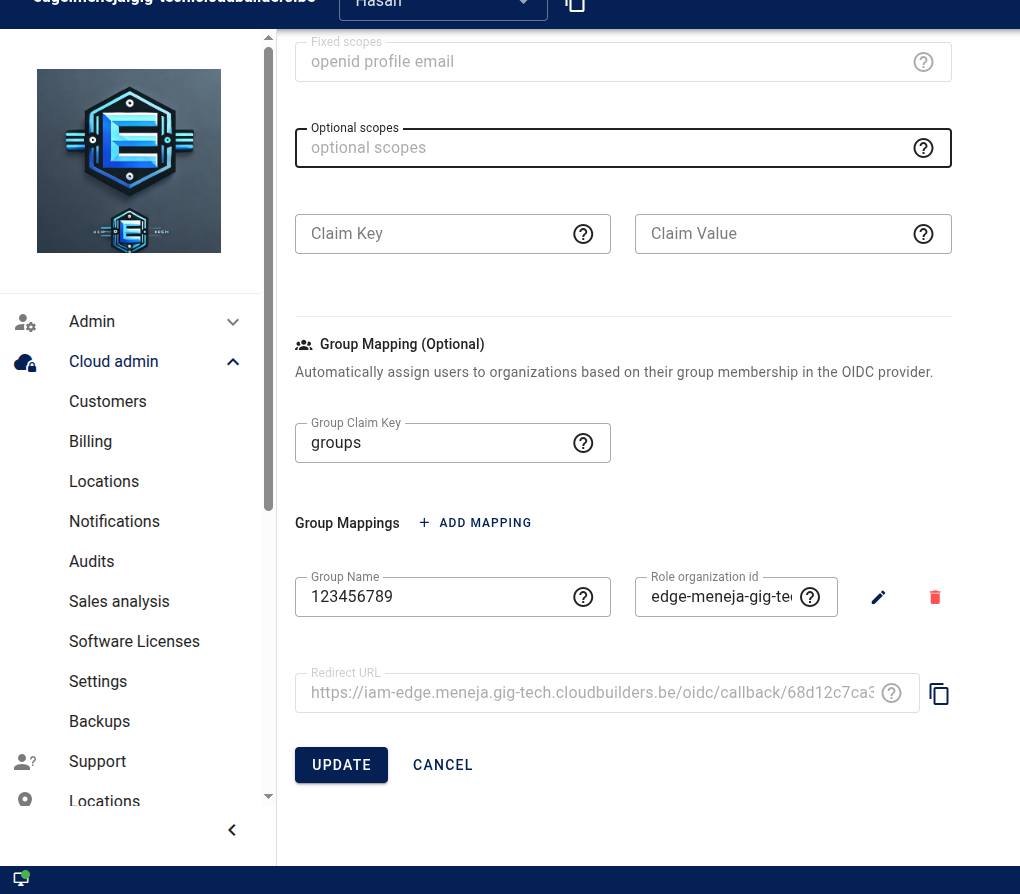
https://login.microsoftonline.com/{tenant_id}/v2.0(replace{tenant_id}with Directory (tenant) ID). - Add your group-to-role mapping using the Group Object IDs you copied in Part 2.
- Group claim key: typically
groups. - Group name/ID: paste the Group Object ID from Part 2.
- Organization/Role: select the internal role/organization to grant on match.
- Click "Create".
- After saving, locate the generated Redirect URI at the bottom of the page (e.g.,
https://<cloud-platform-url>/oidc/callback/PROVIDER_ID). - Copy the entire Redirect URI for the next step.
6. Part 4: Add Redirect URI in Microsoft
Back in the App Registration in Microsoft Entra ID:
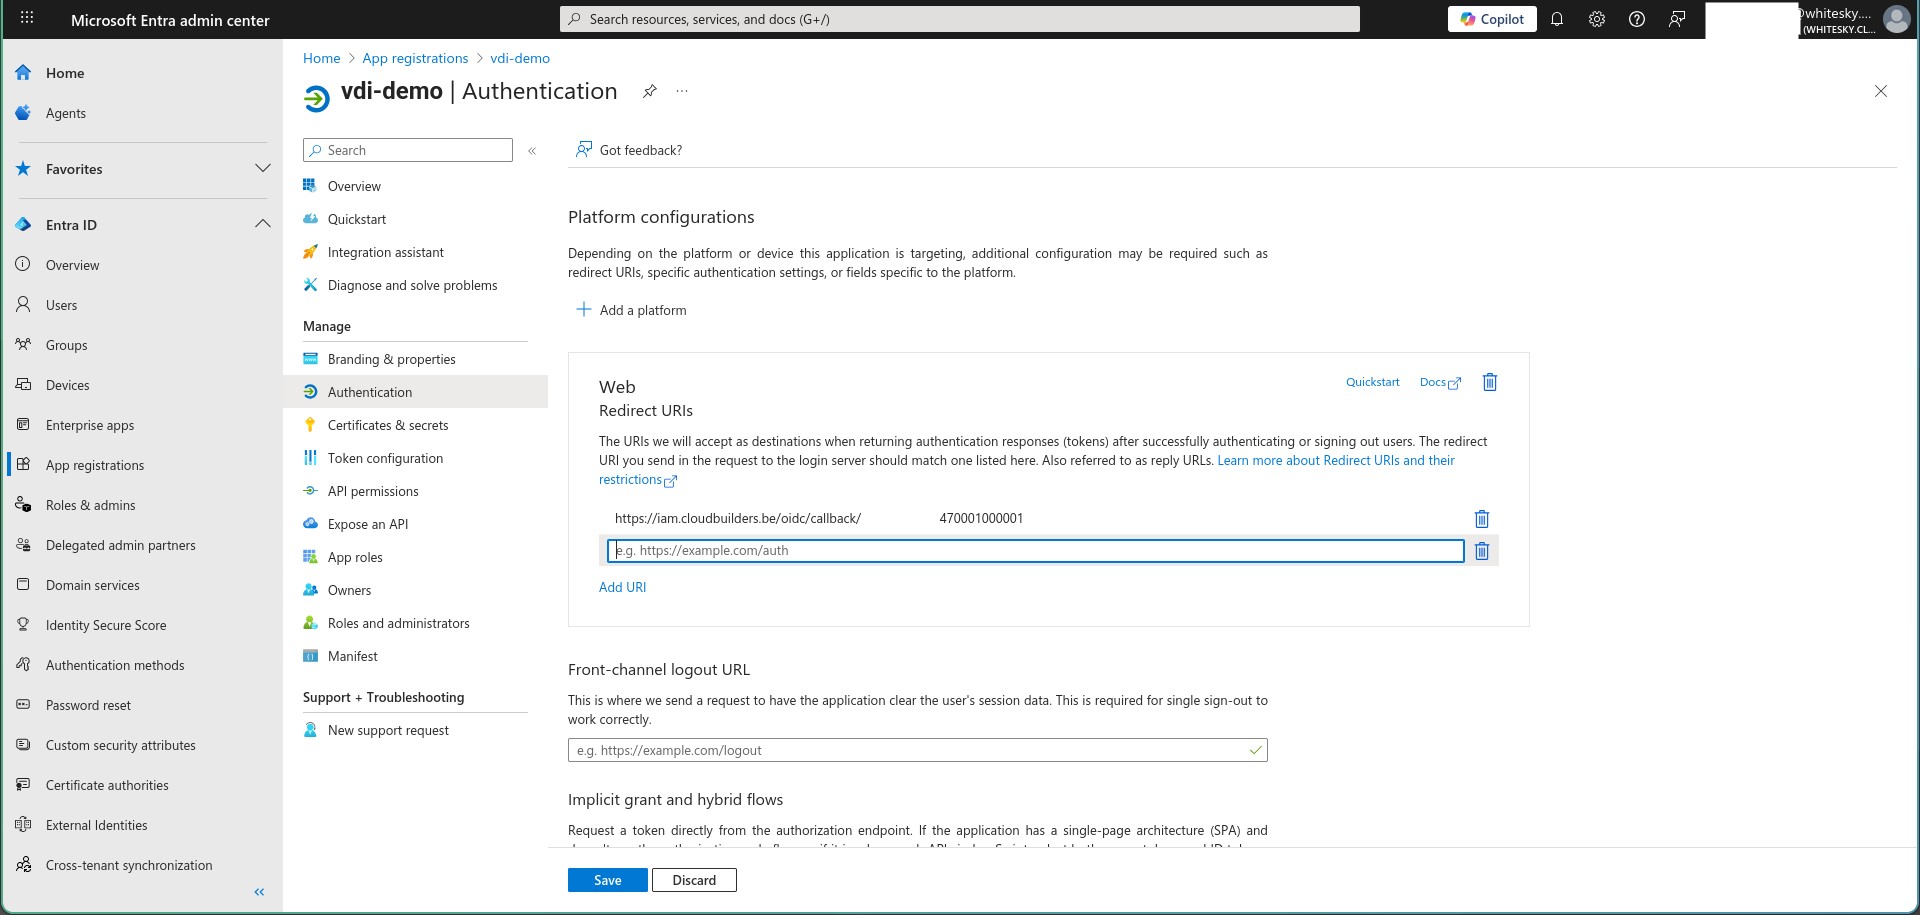
- Open “Authentication”.
- Click “+ Add a platform” → choose “Web”.
- Paste the Redirect URI you copied from Part 3 into “Redirect URIs”.
- Under “Implicit grant and hybrid flows,” check “ID tokens”.
- Click “Configure”.
The secure handshake is now complete.
Note on Group Claims When users log in, the ID token will contain an array of Group Object IDs for all groups the user belongs to (because we enabled group claims in Part 1). Our platform uses these IDs for role mapping configured in Part 3.
7. Conclusion & Next Steps
You have successfully configured Microsoft Entra ID as a secure identity provider for our platform.
Users can now log in using their Microsoft credentials.
8. Troubleshooting Common Issues
| Error (Browser/Logs) | Cause | Solution |
|---|---|---|
| AADSTS50011: The redirect URI specified… | Mismatch between our app’s Redirect URI and the URI configured in Entra Authentication | Paste the exact Redirect URI generated in Part 2 and save in Part 3. |
| AADSTS7000215: Invalid client secret… | Client secret incorrect/expired or copied incorrectly | Create a new client secret (Certificates & secrets), copy its Value, update our platform. |
| Login succeeds, but access not granted | Group membership missing or wrong Group Object ID configured in rules | Verify user’s group memberships and re-copy the group Object ID into the platform rules. |
| “Admin consent required” during login | Required permission needs admin consent | In App Registration → API permissions, click “Grant admin consent for |