Linux VDI RD Gateway
This guide explains how to install and operate a Linux RD Gateway for VDI profiles.
Note
This page explains the Linux VDI RD Gateway binary distributed through the portal. If you are using the Microsoft Windows RD Gateway role instead, see RD Gateway.
When to Use This Guide
Use this guide when your VDI profile uses RD Gateway mode and the portal provides:
- an RD Gateway binary download
- an RD Gateway public key download for the VDI profile
- RDP files that contain a signed gateway access token
What the Gateway Does
VDI users connect with an .rdp file. The .rdp file tells the Remote Desktop client to connect to a public gateway hostname, for example rdgw.example.com. The gateway then forwards the connection to the private VDI VM inside the Cloudspace.
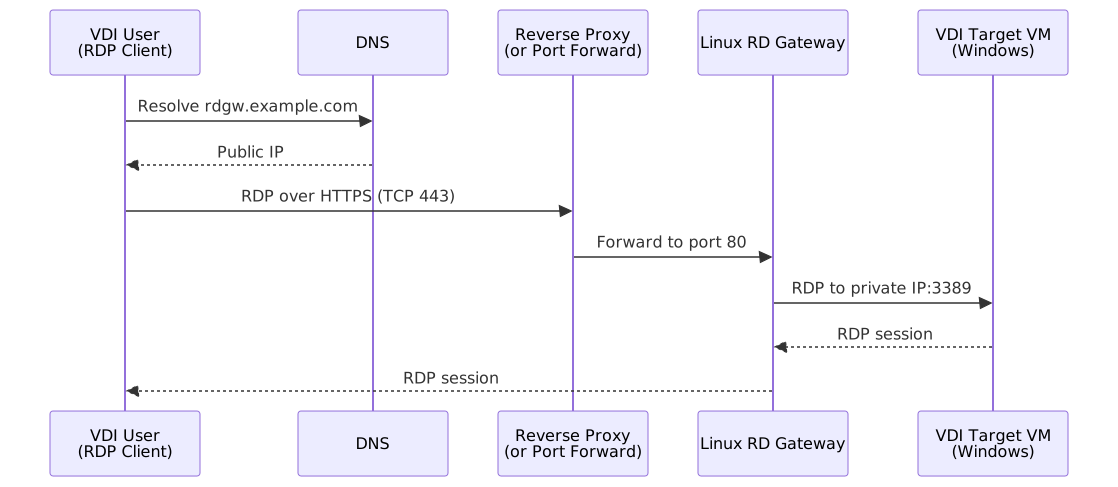
The gateway does not manage Windows users and does not check Windows passwords. Windows login is still handled by your Windows VM or Domain Controller. The gateway only checks that the .rdp file is allowed to reach the target VM.
Quick Start
The following steps summarize the complete installation process:
- Prepare infrastructure - Create an Ubuntu Server VM, set up a public DNS name, and configure a Reverse Proxy (or port forwarding) to expose the gateway.
- Configure the VDI profile - Set the VDI profile to RD Gateway mode in the admin portal, specifying the public DNS hostname and RDP file lifetime.
- Download artifacts - From the VDI profile details page, download the RD Gateway public key and copy the RD Gateway binary URL.
- Copy the public key to the VM - Use
scpto upload the public key file to the gateway VM. - Run the installer - Create and execute the installation script on the gateway VM, passing the binary URL, gateway hostname, profile ID, and public key path.
- Verify installation - Check that the service is running, listening on the expected port, and can reach the target VDI VMs.
- Test a user connection - Download an
.rdpfile from the user portal and open it with an RDP client.
See the sections below for detailed instructions for each step.
Recommended Layout
Use one Linux gateway VM per Cloudspace or network area that contains VDI target VMs. One gateway can serve multiple VDI profiles, as long as the gateway can reach the target VMs for those profiles.
The installed gateway uses this layout:
/opt/rdpgw/rdpgw                        Gateway binary
/etc/rdpgw/rdpgw.yaml                   Configuration file
/etc/rdpgw/keys/<profile_id>.pub        VDI profile public key(s)
/etc/rdpgw/certs/rdgw.crt               TLS certificate (Port Forwarding mode only)
/etc/rdpgw/certs/rdgw.key               TLS private key (Port Forwarding mode only)
/etc/systemd/system/rdpgw.service       Systemd service unit
/var/log/whitesky/rdpgw/rdpgw.log       Log file
/var/lib/rdpgw/vdi-target-cache.json    Target VM cache
Prerequisites
Before installing the gateway, prepare the following.
Gateway VM
Create a fresh Ubuntu Server VM. Ubuntu 22.04 LTS or newer is recommended.
The VM needs:
- internet access to install Ubuntu packages
- network access to the VDI target VMs on TCP port
3389 - a private IP address that receives forwarded gateway traffic
- SSH access for installation and maintenance
Tip
New Linux VMs created in the platform normally use the default username user. If your VM image uses another username, substitute that username in the SSH and scp commands below.
Public Hostname
Create a public DNS record for the gateway, for example:
The DNS record must point to the public IP address that users will connect to.
Expose the Gateway
The recommended way to expose the gateway is using a Reverse Proxy.
Recommended: Reverse Proxy
In the Cloudspace portal:
- In the cloudspace's Ingress tab, open Server pools and create a server pool containing the gateway VM (add it with Add host).
- Open Reverse proxies and create a new proxy.
- Select your Domain, set http scheme to
httpsand Http Port to443. - Set http backend scheme to
http, select your Serverpool, and set Target Port to80.
Alternative: Port Forwarding
If you do not use the Cloudspace Reverse Proxy, you can use port forwarding as an alternative. Forward public TCP port 443 to the Linux gateway VM on TCP port 443.
Warning
Port Forwarding mode requires additional operational overhead:
- You must manually obtain and manage TLS certificates (
cert.pemandsecret.pem). - Certificate rotation must be performed manually before each certificate expires.
- You are responsible for setting up your own monitoring to track certificate expiry and gateway health.
The Reverse Proxy approach is recommended because the platform handles TLS termination and certificate management automatically.
SSH Port Forward (for Installation)
For installation, you need temporary SSH access to the gateway VM. Create a port forward from a public TCP port to the gateway VM private IP on TCP port 22. A common choice is:
After installation, you may keep this SSH port forward for maintenance or remove it if your security policy requires that.
Security Requirements
Warning
Do not expose target VM port 3389 directly to the internet. Never forward public port 3389 to the Windows VDI VMs. Only the gateway port should be public.
Configure the VDI Profile
Configure the VDI profile before installing the gateway. The installer needs the VDI profile ID and the profile public key.
In the admin portal:
- Open VDI.
- Create or open the VDI profile.
- Set Connection Mode to RD Gateway.
- Set RD Gateway Hostname to the public DNS name of the gateway.
- Set the RDP file lifetime.
- Save the profile.
Note
New VDI profiles created in RD Gateway mode already have RD Gateway keys. If you are moving an older existing profile to the Linux gateway, open the profile details page and select Generate RD Gateway keys first.
The RDP file lifetime controls how long a downloaded .rdp file can be used. Choose a value shorter than the profile recycle time to prevent an old .rdp file from being used after the VM has been recycled or reassigned.
The Linux VDI RD Gateway only verifies .rdp files that include a signed token. New RD Gateway profiles include that token by default. Older profiles without keys keep producing plain RD Gateway .rdp files for compatibility with Microsoft RD Gateway. To move an older profile to the Linux gateway, generate keys first, then install the downloaded public key on the gateway server.
Download Portal Artifacts
Open the VDI profile details page in the admin portal and download:
- the RD Gateway public key file
Also copy or download:
- the RD Gateway binary URL
- the RD Gateway binary file (optional fallback)
Using the binary URL is recommended because the installer can download the binary directly on the VM. Downloading the binary file is useful when the VM cannot reach the URL directly.
Tip
The public key belongs to one VDI profile. If the same gateway serves multiple VDI profiles, download and install the public key for each profile.
Install the Gateway
Step 1: Copy Files to the Gateway VM
Locate the downloaded VDI profile public key on your computer:
Copy the file to the Ubuntu gateway VM. Replace rdgw.example.com and the file name with your own values:
If you connect to the VM by public IP instead of DNS, use the public IP:
If SSH uses a custom public port, for example public port 2222 forwarded to VM port 22, add -P 2222:
If the gateway VM cannot download the binary from the URL, download the RD Gateway binary file from the portal and copy it too:
Step 2: SSH Into the Gateway VM
Or, if you use public port 2222:
The rest of this section is run on the gateway VM.
Step 3: Create the Installer Script
Create a file named install-rdpgw.sh on the gateway VM. The script is heavily commented so that each section explains what it does. Copy the entire block below into a single file.
#!/usr/bin/env bash
set -euo pipefail

# This installer configures a Linux VDI RD Gateway on Ubuntu.
# It expects the first VDI profile public key to already exist on the VM.
# The gateway binary can be provided as either:
# - RDPGW_BINARY_URL: URL copied from the portal, downloaded by this script
# - RDPGW_BINARY_FILE: local file path copied to the VM manually

# ─── Helper functions ────────────────────────────────────────────────

# Fail with a readable message when a required environment variable is missing.
require_var() {
  local name="$1"
  if [ -z "${!name:-}" ]; then
    echo "Missing required setting: ${name}" >&2
    exit 1
  fi
}

# Fail with a readable message when a required input file is missing or empty.
require_file() {
  local path="$1"
  local label="$2"
  if [ ! -s "${path}" ]; then
    echo "${label} does not exist or is empty: ${path}" >&2
    exit 1
  fi
}

# ─── Input validation ────────────────────────────────────────────────

# The installer writes system files, installs packages, and creates a systemd
# service, so it must run as root.
if [ "$(id -u)" -ne 0 ]; then
  echo "Run this script with sudo or as root." >&2
  exit 1
fi

# Required installation inputs.
require_var GATEWAY_HOSTNAME
require_var PROFILE_ID
require_var PROFILE_PUBLIC_KEY_FILE

if [ -z "${RDPGW_BINARY_URL:-}" ] && [ -z "${RDPGW_BINARY_FILE:-}" ]; then
  echo "Missing required setting: RDPGW_BINARY_URL or RDPGW_BINARY_FILE" >&2
  exit 1
fi

if [ -n "${RDPGW_BINARY_FILE:-}" ]; then
  require_file "${RDPGW_BINARY_FILE}" "RD Gateway binary"
fi
require_file "${PROFILE_PUBLIC_KEY_FILE}" "VDI profile public key"

# ─── Gateway settings & package installation ─────────────────────────

# Default to Reverse Proxy setup (TLS disabled, listening on port 80).
TLS_MODE="disable"
GATEWAY_PORT="80"

# Optional settings.
ALLOW_PRIVATE_DESTINATIONS="${ALLOW_PRIVATE_DESTINATIONS:-true}"
ALLOWED_DESTINATION_PORTS="${ALLOWED_DESTINATION_PORTS:-3389}"

# Install packages:
# - ca-certificates: trusted CA certificates
# - libcap2-bin: provides setcap, used so rdpgw can bind to port 443
# - openssl: used to generate random gateway secret values
# - curl: used when RDPGW_BINARY_URL is provided
apt-get update
apt-get install -y --no-install-recommends ca-certificates curl libcap2-bin openssl

# ─── Generate secrets & create system user ───────────────────────────

# Generate internal gateway secret values when the administrator did not provide
# them. These values are written to /etc/rdpgw/rdpgw.yaml and should stay stable
# for this gateway after installation.
SESSION_KEY="${SESSION_KEY:-$(openssl rand -hex 16)}"
SESSION_ENCRYPTION_KEY="${SESSION_ENCRYPTION_KEY:-$(openssl rand -hex 16)}"
PAA_TOKEN_SIGNING_KEY="${PAA_TOKEN_SIGNING_KEY:-$(openssl rand -hex 16)}"
PAA_TOKEN_ENCRYPTION_KEY="${PAA_TOKEN_ENCRYPTION_KEY:-$(openssl rand -hex 16)}"

# Create a dedicated system user for the gateway service.
id -u rdpgw >/dev/null 2>&1 || useradd --system --no-create-home --shell /usr/sbin/nologin rdpgw

# ─── Create directories & install the binary ─────────────────────────

# Create the directory layout used by the gateway.
install -d -m 755 /opt/rdpgw
install -d -m 750 /etc/rdpgw /etc/rdpgw/keys /etc/rdpgw/certs
install -d -m 755 /var/log/whitesky /var/log/whitesky/rdpgw
install -d -m 700 /var/lib/rdpgw

# Install the gateway binary. Prefer RDPGW_BINARY_FILE when provided; otherwise
# download it directly from RDPGW_BINARY_URL.
if [ -n "${RDPGW_BINARY_FILE:-}" ]; then
  install -m 755 "${RDPGW_BINARY_FILE}" /opt/rdpgw/rdpgw
else
  curl --fail --location --silent --show-error "${RDPGW_BINARY_URL}" -o /opt/rdpgw/rdpgw
  chmod 755 /opt/rdpgw/rdpgw
fi

# ─── Install public key & write configuration ────────────────────────

# Install the VDI profile public key.
install -m 640 "${PROFILE_PUBLIC_KEY_FILE}" "/etc/rdpgw/keys/${PROFILE_ID}.pub"

# Convert the comma-separated port list into YAML list entries.
IFS=',' read -r -a PORTS <<< "${ALLOWED_DESTINATION_PORTS}"
PORT_YAML=""
for port in "${PORTS[@]}"; do
  PORT_YAML="${PORT_YAML}
          - ${port}"
done

# Write the gateway configuration.
#
# Important settings:
# - Authentication: jwt means the gateway accepts signed VDI RDP files.
# - HostSelection: any means target VMs come from the signed RDP file.
# - AllowedDestinationPorts normally allows only RDP target port 3389.
# - TargetCacheFile stores the newest accepted token per target VM.
cat >/etc/rdpgw/rdpgw.yaml <<EOF
Server:
  Authentication:
    - jwt

  Tls: disable
  GatewayAddress: ${GATEWAY_HOSTNAME}
  Port: ${GATEWAY_PORT}
  HostSelection: any
  AllowPrivateDestinations: ${ALLOW_PRIVATE_DESTINATIONS}
  AllowedDestinationPorts:${PORT_YAML}

  SessionStore: cookie
  SessionKey: "${SESSION_KEY}"
  SessionEncryptionKey: "${SESSION_ENCRYPTION_KEY}"

Caps:
  TokenAuth: true
  SmartCardAuth: false
  IdleTimeout: 30
  EnableClipboard: true
  EnableDrive: false
  EnablePrinter: false
  EnablePort: false
  EnablePnp: false

Security:
  PAATokenSigningKey: "${PAA_TOKEN_SIGNING_KEY}"
  PAATokenEncryptionKey: "${PAA_TOKEN_ENCRYPTION_KEY}"
  EnableUserToken: false
  VerifyClientIp: false

VDI:
  PublicKeyDir: /etc/rdpgw/keys
  DefaultPort: 3389
  ClockSkewSeconds: 60
  MaxTokenAgeSeconds: 0
  TargetCacheFile: /var/lib/rdpgw/vdi-target-cache.json

Client:
  SplitUserDomain: false
  NoUsername: false
EOF

# ─── Write systemd service & start the gateway ───────────────────────

# Write the systemd service.
#
# Logs are written to /var/log/whitesky/rdpgw/rdpgw.log.
# ReadWritePaths limits the service to the log and runtime cache directories.
cat >/etc/systemd/system/rdpgw.service <<'EOF'
[Unit]
Description=VDI Remote Desktop Gateway
After=network-online.target
Wants=network-online.target

[Service]
Type=simple
WorkingDirectory=/opt/rdpgw
ExecStart=/opt/rdpgw/rdpgw -c /etc/rdpgw/rdpgw.yaml
Restart=on-failure
RestartSec=5
User=rdpgw
Group=rdpgw
NoNewPrivileges=true
AmbientCapabilities=CAP_NET_BIND_SERVICE
CapabilityBoundingSet=CAP_NET_BIND_SERVICE
ProtectSystem=strict
ReadWritePaths=/var/log/whitesky/rdpgw /var/lib/rdpgw
StandardOutput=append:/var/log/whitesky/rdpgw/rdpgw.log
StandardError=append:/var/log/whitesky/rdpgw/rdpgw.log

[Install]
WantedBy=multi-user.target
EOF

# Give all installed files to the dedicated rdpgw user.
chown -R rdpgw:rdpgw /opt/rdpgw /etc/rdpgw /var/log/whitesky /var/lib/rdpgw

# Lock down permissions.
chmod 755 /opt/rdpgw/rdpgw
chmod 640 /etc/rdpgw/rdpgw.yaml "/etc/rdpgw/keys/${PROFILE_ID}.pub"

# Allow the binary to bind to privileged ports such as 80 or 443 without running the
# whole service as root.
setcap 'cap_net_bind_service=+ep' /opt/rdpgw/rdpgw

# Stop immediately if any required installed file is missing.
test -s /opt/rdpgw/rdpgw
test -s /etc/rdpgw/rdpgw.yaml
test -s "/etc/rdpgw/keys/${PROFILE_ID}.pub"

# Register and start the service.
systemctl daemon-reload
systemctl enable rdpgw
systemctl restart rdpgw

echo "RD Gateway installed and started."
echo "Log file: /var/log/whitesky/rdpgw/rdpgw.log"
Step 4: Run the Installer
Make the script executable:
Run the installer with your values:
sudo RDPGW_BINARY_URL="https://portal.example.com/path/to/temporary/rdpgw-download-url" \
  GATEWAY_HOSTNAME="rdgw.example.com" \
  PROFILE_ID="your_vdi_profile_id" \
  PROFILE_PUBLIC_KEY_FILE="/home/user/your_vdi_profile_id.pub" \
  ./install-rdpgw.sh
Replace:
https://portal.example.com/path/to/temporary/rdpgw-download-urlwith the binary URL copied from the portalrdgw.example.comwith your gateway DNS nameyour_vdi_profile_idwith the VDI profile ID/home/user/your_vdi_profile_id.pubwith the public key file downloaded from the VDI profile details page
If the VM cannot download the binary from the URL, use a local binary file instead:
sudo RDPGW_BINARY_FILE="/home/user/rdpgw" \
  GATEWAY_HOSTNAME="rdgw.example.com" \
  PROFILE_ID="your_vdi_profile_id" \
  PROFILE_PUBLIC_KEY_FILE="/home/user/your_vdi_profile_id.pub" \
  ./install-rdpgw.sh
Verify the Installation
Check that the service is running:
Check that the gateway is listening on port 80:
Watch the gateway log:
From the gateway VM, check that the Windows target VM is reachable on RDP:
Replace 192.168.10.10 with the private IP of a target VDI VM.
Test a User Connection
- Open the VDI profile's landing page (the link your administrator shared with you).
- Click Start RDP Session, and wait for the session to become ready — the page shows progress ("Starting RD Gateway session…", "Creating your virtual machine…", "Setting up RD Gateway connection…").
- The
.rdpfile downloads automatically once the session is ready. On Linux, the page also offers Download Remmina File — a ready-to-use.remminaconnection profile, which is the simpler path if you use Remmina rather than importing and manually reconfiguring the.rdpfile. - Open the downloaded file with Microsoft Remote Desktop, Remmina, or another RDP client.
- Sign in with the Windows or domain credentials used by the target VM.
If Windows rejects the username or password, the gateway is already working. Credential validation happens on the Windows VM or Domain Controller.
Manage VDI Profiles on the Gateway
Add Another VDI Profile
Download the public key for the second VDI profile from the admin portal. Then create a file named add-rdgw-profile.sh on the gateway VM:
View full script
This script validates the inputs and installs the public key into /etc/rdpgw/keys/.
#!/usr/bin/env bash
set -euo pipefail

if [ "$(id -u)" -ne 0 ]; then
  echo "Run this script with sudo or as root." >&2
  exit 1
fi

if [ "$#" -ne 2 ]; then
  echo "Usage: $0 <profile_id> <public_key_file>" >&2
  exit 1
fi

PROFILE_ID="$1"
PUBLIC_KEY_FILE="$2"

case "${PROFILE_ID}" in
  *[!A-Za-z0-9_.-]*|'')
    echo "Invalid profile ID. Use only letters, numbers, dot, underscore, and dash." >&2
    exit 1
    ;;
esac

if [ ! -s "${PUBLIC_KEY_FILE}" ]; then
  echo "Public key file does not exist or is empty: ${PUBLIC_KEY_FILE}" >&2
  exit 1
fi

install -d -m 750 -o rdpgw -g rdpgw /etc/rdpgw/keys
install -m 640 -o rdpgw -g rdpgw "${PUBLIC_KEY_FILE}" "/etc/rdpgw/keys/${PROFILE_ID}.pub"

echo "Installed public key: /etc/rdpgw/keys/${PROFILE_ID}.pub"
Run it:
chmod +x add-rdgw-profile.sh
sudo ./add-rdgw-profile.sh "second_profile_id" "/home/user/second_profile_id.pub"
The gateway reads public keys from /etc/rdpgw/keys. A restart is normally not required when only adding a profile public key.
Remove a VDI Profile
Create a file named remove-rdgw-profile.sh on the gateway VM:
View full script
#!/usr/bin/env bash
set -euo pipefail

if [ "$(id -u)" -ne 0 ]; then
  echo "Run this script with sudo or as root." >&2
  exit 1
fi

if [ "$#" -ne 1 ]; then
  echo "Usage: $0 <profile_id>" >&2
  exit 1
fi

PROFILE_ID="$1"

case "${PROFILE_ID}" in
  *[!A-Za-z0-9_.-]*|'')
    echo "Invalid profile ID. Use only letters, numbers, dot, underscore, and dash." >&2
    exit 1
    ;;
esac

rm -f "/etc/rdpgw/keys/${PROFILE_ID}.pub"
echo "Removed public key: /etc/rdpgw/keys/${PROFILE_ID}.pub"
Run it:
Removing a public key prevents new .rdp files for that profile from being accepted by the gateway.
Update the Gateway Binary
When the portal provides a newer gateway binary, copy the new binary to the VM first:
If SSH uses public port 2222, use:
Then replace the installed binary:
sudo systemctl stop rdpgw
sudo cp /opt/rdpgw/rdpgw /opt/rdpgw/rdpgw.previous
sudo cp /home/user/rdpgw.new /opt/rdpgw/rdpgw
sudo chown rdpgw:rdpgw /opt/rdpgw/rdpgw
sudo chmod 755 /opt/rdpgw/rdpgw
sudo setcap 'cap_net_bind_service=+ep' /opt/rdpgw/rdpgw
sudo systemctl start rdpgw
sudo tail -f /var/log/whitesky/rdpgw/rdpgw.log
Tip
A backup of the previous binary is kept at /opt/rdpgw/rdpgw.previous. If the new binary does not work, roll back:
Change the Gateway Configuration
The main configuration file is /etc/rdpgw/rdpgw.yaml.
After changing the file, restart the service:
Configuration Reference
| Setting | Section | Type | Default | Description |
|---|---|---|---|---|
GatewayAddress |
Server | string | — | Public DNS name used by RDP clients. Must match the RD Gateway Hostname set in the VDI profile. |
Port |
Server | integer | 80 |
Listen port. Use 80 for Reverse Proxy mode, 443 for Port Forwarding mode. |
Tls |
Server | string | disable |
Set to enable when using Port Forwarding mode with TLS certificates. |
CertFile |
Server | string | — | Path to TLS certificate file. Required when Tls: enable. |
KeyFile |
Server | string | — | Path to TLS private key file. Required when Tls: enable. |
HostSelection |
Server | string | any |
Target VM selection mode. any allows targets from the signed RDP file. |
AllowPrivateDestinations |
Server | boolean | true |
Allow connections to private IP addresses. Typically true for Cloudspace VDI target VMs. |
AllowedDestinationPorts |
Server | list | [3389] |
Comma-separated list of allowed target VM ports. Usually only 3389 for RDP. |
SessionKey |
Server | string | auto-generated | Internal session key. Auto-generated on first install; keep stable across restarts. |
SessionEncryptionKey |
Server | string | auto-generated | Internal session encryption key. Auto-generated on first install. |
IdleTimeout |
Caps | integer | 30 |
Idle gateway timeout in minutes. Disconnect idle sessions after this duration. |
EnableClipboard |
Caps | boolean | true |
Allow clipboard redirection between client and VDI. |
EnableDrive |
Caps | boolean | false |
Allow drive redirection (access local client drives from VDI). |
EnablePrinter |
Caps | boolean | false |
Allow printer redirection. |
EnablePort |
Caps | boolean | false |
Allow serial/USB port redirection. |
EnablePnp |
Caps | boolean | false |
Allow Plug and Play device redirection. |
PublicKeyDir |
VDI | string | /etc/rdpgw/keys |
Directory containing VDI profile public key files. |
DefaultPort |
VDI | integer | 3389 |
Default target port when not specified in the RDP token. |
ClockSkewSeconds |
VDI | integer | 60 |
Allowed clock skew in seconds when validating RDP token signatures. |
MaxTokenAgeSeconds |
VDI | integer | 0 |
Maximum token age in seconds. 0 means no limit (relies on profile RDP file lifetime). |
PAATokenSigningKey |
Security | string | auto-generated | Internal PAA token signing key. |
PAATokenEncryptionKey |
Security | string | auto-generated | Internal PAA token encryption key. |
Alternative Setup: Port Forwarding with TLS
If you use port forwarding instead of the Cloudspace Reverse Proxy, the gateway must handle TLS directly. This section describes how to enable TLS on the gateway.
Warning
Port Forwarding mode requires manual certificate management. You are responsible for obtaining valid TLS certificates, rotating them before expiry, and setting up your own monitoring for certificate expiry and gateway health.
Install TLS Certificates
Copy your public certificate and private key to the Ubuntu gateway VM:
scp cert.pem user@rdgw.example.com:/home/user/rdgw.crt
scp secret.pem user@rdgw.example.com:/home/user/rdgw.key
Then SSH into the gateway VM and move the certificates to the configuration directory:
sudo cp /home/user/rdgw.crt /etc/rdpgw/certs/rdgw.crt
sudo cp /home/user/rdgw.key /etc/rdpgw/certs/rdgw.key
Set the correct ownership and permissions:
sudo chown rdpgw:rdpgw /etc/rdpgw/certs/rdgw.crt /etc/rdpgw/certs/rdgw.key
sudo chmod 640 /etc/rdpgw/certs/rdgw.crt /etc/rdpgw/certs/rdgw.key
Enable TLS in Configuration
Edit the gateway configuration file:
Update the Server section to enable TLS and change the listen port to 443:
Server:
  Authentication:
    - jwt

  Tls: enable
  CertFile: /etc/rdpgw/certs/rdgw.crt
  KeyFile: /etc/rdpgw/certs/rdgw.key

  GatewayAddress: rdgw.example.com
  Port: 443
After saving the file, restart the gateway service:
Check that the gateway is listening on port 443:
Day-2 Operations
View Logs
# Follow the log file in real time
sudo tail -f /var/log/whitesky/rdpgw/rdpgw.log

# View the last 100 lines
sudo tail -n 100 /var/log/whitesky/rdpgw/rdpgw.log

# View logs via systemd journal
sudo journalctl -u rdpgw -n 100 --no-pager
Restart the Service
Check Service Health
# Check service status
sudo systemctl status rdpgw

# Verify the gateway is listening on the expected port
sudo ss -ltnp | grep ':80'   # Reverse Proxy mode
sudo ss -ltnp | grep ':443'  # Port Forwarding mode
Monitor Log File Size
The gateway log at /var/log/whitesky/rdpgw/rdpgw.log grows over time. Monitor disk space and rotate the log if needed:
Tip
You can set up logrotate for the gateway log to automatically rotate and compress old log files. Create /etc/logrotate.d/rdpgw:
Rotate TLS Certificates (Port Forwarding Mode)
When using Port Forwarding mode, you must rotate TLS certificates before they expire:
# 1. Copy new certificate files to the VM
scp new_cert.pem user@rdgw.example.com:/home/user/rdgw.crt.new
scp new_secret.pem user@rdgw.example.com:/home/user/rdgw.key.new

# 2. SSH into the VM and replace the certificates
sudo cp /home/user/rdgw.crt.new /etc/rdpgw/certs/rdgw.crt
sudo cp /home/user/rdgw.key.new /etc/rdpgw/certs/rdgw.key
sudo chown rdpgw:rdpgw /etc/rdpgw/certs/rdgw.crt /etc/rdpgw/certs/rdgw.key
sudo chmod 640 /etc/rdpgw/certs/rdgw.crt /etc/rdpgw/certs/rdgw.key

# 3. Restart the gateway to pick up the new certificates
sudo systemctl restart rdpgw
Warning
Set up calendar reminders or monitoring alerts for certificate expiry dates when using Port Forwarding mode. An expired certificate will block all VDI connections.
Check Target VM Reachability
From the gateway VM, verify that the gateway can reach the target VDI VMs:
timeout 5 bash -c '</dev/tcp/192.168.10.10/3389' && echo "RDP reachable" || echo "RDP not reachable"
Replace 192.168.10.10 with the private IP of a target VDI VM.
Troubleshooting
Service Does Not Start
Check the service status and logs:
sudo systemctl status rdpgw
sudo journalctl -u rdpgw -n 100 --no-pager
sudo tail -n 100 /var/log/whitesky/rdpgw/rdpgw.log
Tip
If the installer script failed partway through, you can re-run it. The script is idempotent for most steps. If issues persist, check that the required environment variables are set and that the public key file exists at the specified path.
Users Cannot Reach the Gateway
Check:
- DNS resolves to the correct public IP
- public TCP
443is forwarded to the gateway (or the Reverse Proxy is configured correctly) - the gateway service is running
- the gateway is listening on the expected port (
80for Reverse Proxy,443for Port Forwarding) - in Port Forwarding mode, the certificate matches the public hostname and has not expired
The Gateway Rejects the RDP File
Check:
- the VDI profile public key exists in
/etc/rdpgw/keys - the file name is exactly
<profile_id>.pub— the filename must match the VDI profile ID character-for-character - the user downloaded a fresh
.rdpfile - the
.rdpfile has not expired (check the RDP file lifetime setting in the VDI profile) - the VDI profile hostname matches the gateway DNS name
Warning
A common mistake is uploading the public key with a filename that does not match the VDI profile ID. The gateway will silently reject RDP files if the key filename does not match. Verify with:
The Connection Starts but Windows Login Fails
The gateway connection succeeded. Check the Windows username, password, domain, Domain Controller, and target VM login permissions.
The Gateway Cannot Reach the Target VM
From the gateway VM, test TCP 3389 to the target VM:
timeout 5 bash -c '</dev/tcp/192.168.10.10/3389' && echo "RDP reachable" || echo "RDP not reachable"
If this fails, check:
- the target VM is powered on
- Remote Desktop is enabled on the target VM
- the Windows firewall allows Remote Desktop
- the gateway VM and target VM are in networks that can reach each other
Security Checklist
- [ ] Do not expose target VM port
3389directly to the internet. - [ ] Keep only TCP
443public for the gateway unless your design requires more. - [ ] Keep
/etc/rdpgw/certs/rdgw.keyprivate (Port Forwarding mode). - [ ] Keep
/etc/rdpgw/rdpgw.yamlreadable only by administrators and the gateway service user. - [ ] Remove public keys for VDI profiles that no longer use this gateway.
- [ ] Keep the gateway VM updated with operating system security updates.
- [ ] Use an RDP file lifetime shorter than the VDI profile recycle time.